
If getting more leads and ready-to-buy customers as soon as possible sounds good to you, you should consider advertising your business on Google.
No idea what Google ad is? read this earlier post to get an overview of Google advertising.
Back in 2022, Google owns 92% of the global search market share as there were 6.9 billion searches a day on Google. Even more interesting is the fact that online users are 4x more likely to click on ads on Google (63%) than on any other advertising network.
By the end of this article, you would have learned the step-by-step process of how to launch a Google ads campaign, positioning your business two steps ahead of the competition.
Now you might be asking the question: what are the benefits of Google ads for my business?
The Benefits of Google Ads for Your Business
Well, there are three main benefits that come with advertising your business on Google.
The first (and arguably the most enticing) benefit of Google ads is that it gives you control over how you spend your money. You’ll only pay when someone clicks your ad.
The second benefit is that Google ads allow you to measure your success so if someone clicked your ad, you’ll know. If they clicked your ad and then did something valuable to your business like buying your product or downloading your app, you can track that as well.
And by seeing which ads get clicks and which ones don’t, you’ll also see where to invest in your campaign which, in turn, can boost the return on your investment.
The third main benefit of Google ads is it’s targeting. Google ads targeting gives you the ability to show your ads to people with specific interests, and people who want your products and services.
That being said, before creating a Google ads account, you need to understand the importance of Google ads account structure and how to organize it.
Google Ads Account Structure
Why is it important to understand your Google ads account structure?
Understanding the way to set up your Google Ads account gives you control over how, when, and where your ads show. If you do not have a well-structured account, mistakes are bound to happen.
A well-structured ad account will:
Ensure that searches triggering your ad are relevant to the people searching.
Result in a higher Quality score which means better results and lower cost per ad click for keywords your competitor would also be bidding on.
Keep you organized and able to optimize. With a disorganized ad structure, you risk getting poor results from your ads (or not getting results at all).
Also, a messy ad account structure will make it difficult to optimize your ads for better performance.
Hierarchy of Google Ads Account Structure
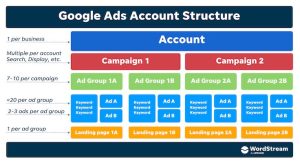
Before you launch Google ads, you need to understand the different components that make up a Google ad account hierarchy. Let’s go over each component.
Campaign: Campaigns are often used to organize categories of products or services that you offer. Unless your account is very large, you’ll only have a few campaigns that surround broader themes.
For instance, a shoe store that sells men’s and women’s shoes can have two campaigns in their Google ad account. One for men’s shoes, and the other for women’s shoes. Each campaign will contain ad groups, which contain keywords that tie to your text ads and direct to your landing page.
I recommend deciding on campaign topics based on how you want to divide your marketing budget since you set up your budget at the campaign level.
Ad Groups: Under each campaign, you will create relevant ad groups which will be much more specific. There’s no recommended number of ad groups to have under a campaign but it’s more manageable to not go overboard since this will stretch your campaign budget across so many ad groups, keywords, ads, and landing pages, that results could suffer.
Ad groups contain keywords (no more than 10-20 per ad group), these keywords will trigger your text ads (2-3 per ad group), and then direct searchers to a relevant landing page.
Keywords: Keywords will fall under each ad group, and are very important to control the way your ad is triggered. When someone types in the search box in Google, that search is a “search query,” which is then matched with a keyword, which then triggers an ad. Each keyword will have a Max CPC, match type, and Quality score tied to it.
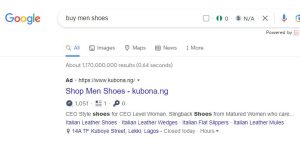
Ad Text: This is the text that will actually show when your ad is triggered. There should be 2 to 3 ads in each ad group, all of which should lead to the same landing page. To beat your rivals in the search results, A/B test your ads over time and emphasize the benefits of your products or services.
Landing Pages: The last component in the hierarchy of Google ads accounts is the landing pages. The destination where each ad will direct the searcher to (likely a page on your website with an offer or call-to-action).
I recommend being on-topic with your landing pages, making sure that each ad directs to a relevant page, which reflects not only the keywords you’re bidding on within that ad group but also the ad text displayed in the SERPs (search engine result page).
Landing page relevancy and optimization are critical to see success with PPC. Now that you have an idea of what each level in the hierarchy of Google ads account structure is about, let’s move on to launching an ad campaign
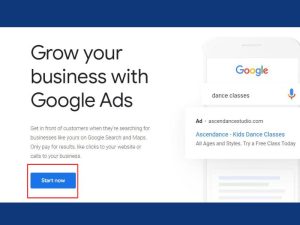
Create a Google Ads Account
To begin running ads on Google you will need a Google ads account. Go to ads.google.com and click Start now.
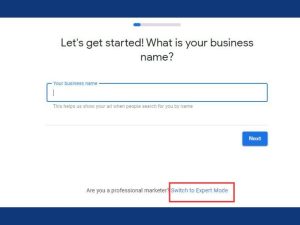
Scroll down to the bottom of the page and Switch to expert mode.
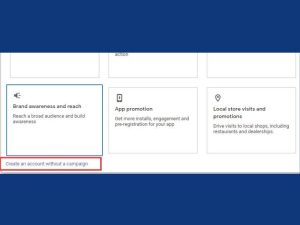
You will get a prompt to choose a campaign objective but I’d recommended selecting create an account without a campaign instead.
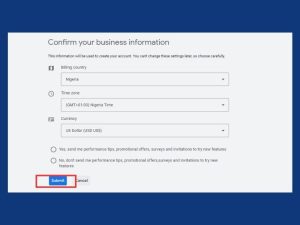
Setup your billing information – Select your billing country, timezone, and currency. Click Submit when you are done.
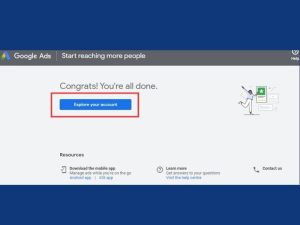
After submitting your billing information, you are set to explore your Google ads account. Click Explore your account.
The next step you’d want to take is setting up your Google ads billing. This means crediting your ads account with money you intend to spend on running ad campaigns.
Your ads account will only be charged after you have launched an ad campaign and started getting clicks. In other words, you only get charged when your ads get clicks.
Setting Up Google Ads Account Billing
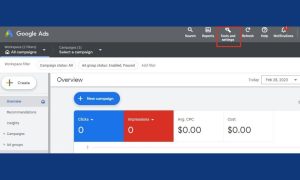
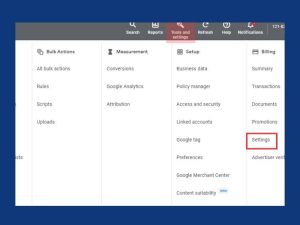
To set up your billing go to Tools and Settings
Under Billing, click on Settings.
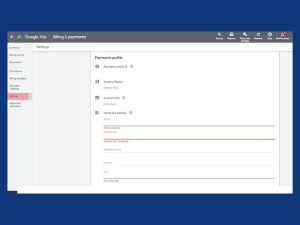
The next thing you want to do is set up payment for your ad account. You will get a payments account ID & nickname.
Choose how you pay (I’d recommend manual payments), Choose your account type (individual/organization), and Fill out your name, location, and phone number. Save all updates.
Click on Payment methods to add your card details and fund your ad account.
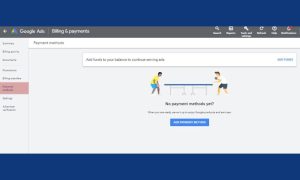
After adding your payment method, return to the ad account dashboard.
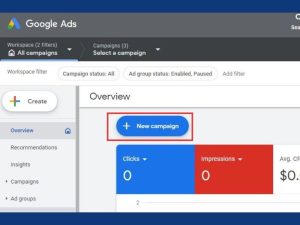
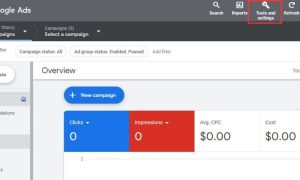
Now it’s time to create your first campaign and when you click on NEW CAMPAIGN, you will be prompted to choose your campaign objective.
These objectives are also known as conversions – when a visitor to your website completes a desired goal e.g. making a purchase or filling out a lead form. Now, these campaign objectives take into account the actions that are happening on your website, whether it’s purchases or someone filling out a lead form, or making a phone call to your business and that allows you to optimize your campaigns for your key performance indicators KPI.
So before launching a campaign, I’d recommend you set up conversion tracking. This would help you see how your ad clicks lead to valuable customer activity on your website.
Set Up Google Ads Conversion Tracking
Any measure of success for your business’s advertising efforts, no matter what it is, can be tracked in Google ads and you can optimize your budgets and campaigns to drive more conversions. There are different ways to set up conversion tracking for your website. But for this guide, you will learn how to set up conversion tracking using Google Analytics. Bear in mind, for this method to work you need to have installed Google Analytics on your website to track web traffic data and user behavior.
Set Up Conversion Tracking Using Google Analytics 4
Before you proceed to link your analytics account to your ad account ensure your website, Google Analytics, and Google ads account all use the same Google account. (courtesy of your Gmail address)
When you create a Google account, you also get a Gmail address. However, you do not have to own a Gmail address to have access to a Google account, follow these steps to link your non-Gmail address to a Google account.
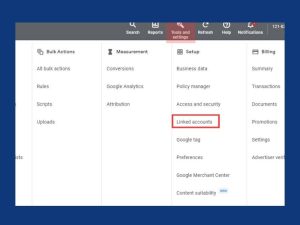
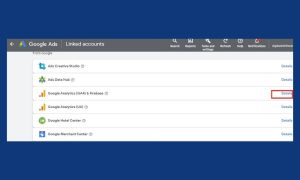
Assuming you are all set up and ready, what you want to do next is to Go to Tools and Settings in your Google Ads account. Under Setup, select Linked Accounts
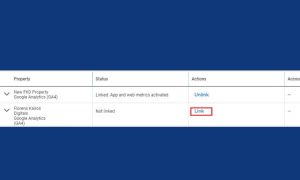
Click Details by the Google Analytics (GA4) option. Turn on Auto-tagging, then click on Link (to link your Google Analytics GA4 property to your ad account). I’d also recommend that you turn on import Google analytics audiences after linking.
Create a Conversion Event Through Google Analytics 4
An event is any action that your website visitors take on your website and you can set any of these actions as a conversion. You can view and track your website events through Google Analytics.
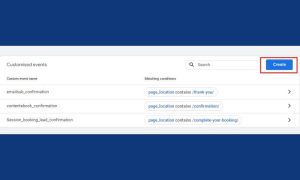
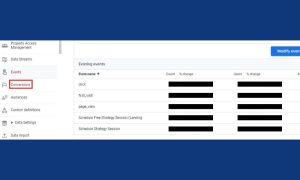
To view your events in analytics, follow these steps: Go to your Google Analytics dashboard, and click on Admin. Then select Events

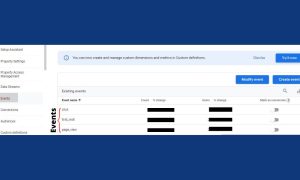
Notice there are already some existing events. These events can be set as conversions if any of them is a measure of success for your business. For example, you can set ‘first visit’ as a conversion and this would count the number of first-time visitors to your website.

To set up a conversion action for your Google ads campaign, you’d want to create a new event in Google Analytics (you can create multiple events).
Set this new event as a conversion, and then import the new conversion into your Google ads account. Assuming you have Google Analytics installed on your website.
When a web visitor takes an action on your website that was set as a conversion, you would be able to track that conversion across your Google Analytics and Google ads campaign data.
Create a New Event in Google Analytics 4
A simple way to track when prospects submit a form on your landing page or complete a sale is with a ‘Thank you’ page or ‘Purchase confirmation’ page. Make sure these pages ain’t accessible to web visitors on the main pages of your website.
Prospects should only be able to visit these pages after they have completed an action. Assuming you want to track a lead form submission as a conversion. You’d have to set conversion event parameters that trigger a conversion count whenever a prospect fills out the form and is sent to a ‘Thank You’ page.
Remember, a prospect can only view that page whenever they have successfully submitted a lead form. To create a custom event, From your Google Analytics dashboard, go to Admin. Events. And then Create Event.
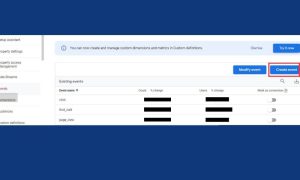
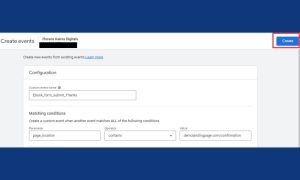
To create a new custom event, click Create
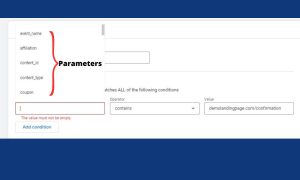
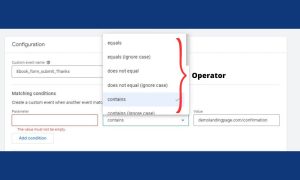
Give your custom event name a title (I named mine Ebook_form_submit_Thanks ) and set matching conditions.
Tip: Be specific when naming your events, this would make them easily recognizable in the future.
For example, I created a custom event for the Thank you page users are directed to after filling out a form on a landing page. Every user who lands on the Thank you page is counted as a form submission conversion.
In the matching conditions section, Page location means ‘web page’, Contains means ‘includes’, and Value is the specific web page path link you want to track. In my case that would be demolandingpage.com/confirmation for the ‘Thank you’ page.
Notice I did not enter a complete webpage URL like www.demolandingpage.com/confirmation.
This is because the Value only requires a path link or string of characters – letters or numbers – that is unique to the webpage you want to track. So no other webpage URL on my demolandingpage.com website contains this path link or string of characters: demolandingpage.com/confirmation, the Thank you page I could also use /confirmation if the Thank you page is the only webpage on the website that contains the word “confirmation”.
[Page_location contains demolandingpage.com/confirmation]
This means that an event action should be counted when a prospect lands on the web page whose URL contains demolandingpage.com/confirmation (the ‘Thank you’ page). This example can also apply if you want to create a ‘purchase confirmation’ event.
You can explore more parameters and operators in the matching conditions section if you want to create other types of events.
And you can also include additional conditions if you want more than one condition to be ‘true’ before an event is counted.
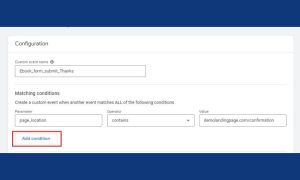
To save the new event, click Create.
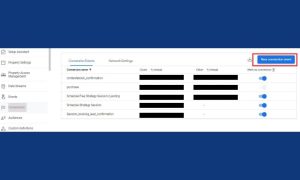
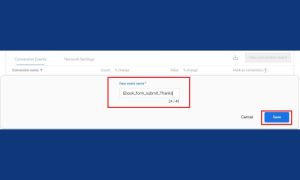
Now your new event might not show up in your ‘existing events’ column until it gets a certain number of event counts. So it can’t be directly set as a conversion on that table. To set it as a conversion, go to Conversion.
Create a new conversion event. Give it the exact name as the newly created event, Ebook_form_submit_Thanks. Click Save
This event will start counting every time a prospect visits the ‘Thank You’ page.
It is important to note that it might take up to 24 hours to start receiving event count data. So I’d recommend that you launch your ads 24 hours after you have set up conversion tracking.
To Import Conversion Event Into Google Ads
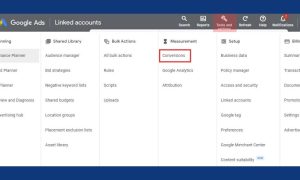
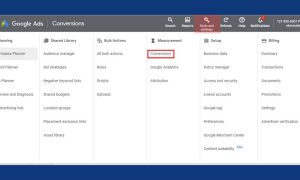
Go to Tools and settings in your Google Ads account. Under Measurement, click on Conversions.
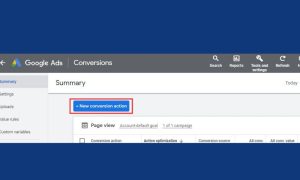
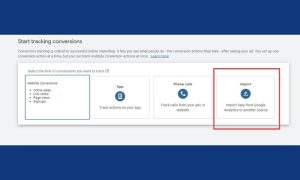
Click on New conversion action. Under select the kind of conversions you want to track select Import. And under select what you want to import select Google Analytics 4 Properties, and choose Web. Click Continue.

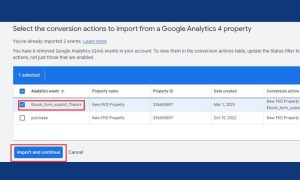
A table of conversion actions from your Google Analytics account will be displayed. Choose the Conversion action you created in your Google Analytics. For this example that would be Ebook_form_submit_Thanks. Click Import and continue.
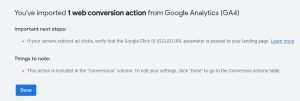
Click Done. Now every time someone fills out the lead form and is directed to the ‘Thank You’ page, it will count as a conversion. I’d recommend you optimize your conversion action settings to get the best results from your ads. To do this, click on the imported conversion action listed in the conversion table.
To see the conversion table, click on Tools and settings. Under Measurement, click on Conversions.

Click on Edit settings
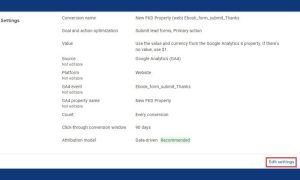
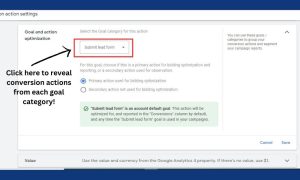
To choose the conversion action you want to optimize your ads for click on Goals and action optimization.
In the selection box choose the conversion action you want to optimize your ad for. The Conversion actions are categorized according to goals. For example, A ‘submit lead form’ action is under the Leads categories.
Check out the other settings. There are important ones to adjust that could affect the performance of your ad campaign.
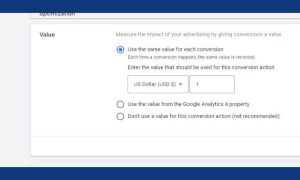
Set the value of every conversion in the Value selection. You generally want to leave the conversion value at the default $1 for a lead generation conversion. Similarly, if you are selling products of equal value (price), you can set the value here as well.
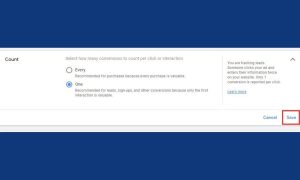
For example, if all your products cost $5, you’d set the conversion value at $5. Under the Count selection, choose how your conversions are counted. For instance, in lead generation conversion only the first interaction is valuable. So no matter how many times a person submits a form, only the first submission counts.
However, in purchase-related conversions where you are selling a product, every conversion counts. Do not forget to save any changes you’ve made.
Ensure to check all the settings and optimize for those that affect your ad performance. When you finish making all your changes, click Done. After setting up conversion tracking, you can proceed to create a new campaign. In this example, I will focus on how to create a search ad campaign with the objective of generating new leads.
How To Create A Search Ad Campaign
Create a New Campaign
Click New campaign on your Google ad account dashboard
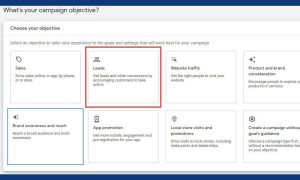
Choose Your Objective
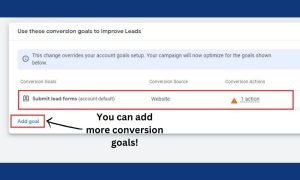
Choose Leads as the campaign objective because the goal of this ad campaign is to get new leads. In the section use these conversion goals to improve leads. Choose the conversion action(s) you previously imported into your Google ad account.
Tip: You can add more lead conversion goals if it makes sense for your business. You will get an error message saying your conversion action is inactive or unverified. That error message will disappear once your ads start driving conversions.
Choose Your Campaign Type
Click Continue and choose your Campaign type. For this guide, the campaign type of choice is Search.

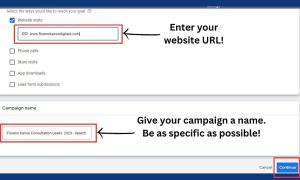
Select Website visits and enter your website URL under the section select the ways you’d like to reach your goal if you want to drive web traffic to your website. You can choose any of the other options depending on your goal. Give your campaign a name
Tip: To maintain an organized ad account structure, I’d recommend that your campaign name should be theme-based e.g. A clothing store trying to launch an ad campaign for their latest collection could name their campaigns based on gender (one campaign named “Men Summer collection 2022 – Search” and the other “Women Summer collection 2022 – Search”
Choose a Bidding Strategy
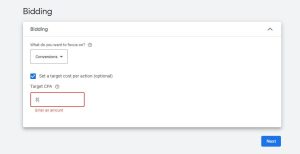
When choosing a bidding strategy think about what you want your ads to achieve during a campaign. At every auction, Google will place bids for your ads to show on SERPs using the bidding strategy you chose to optimize your ads for. For this example, I selected conversion which is why I previously set up conversion tracking. There are other bid strategies to choose from depending on your campaign goal.
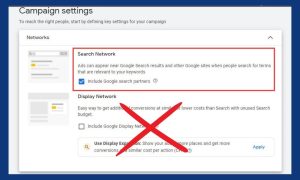
Network Settings
Here you will choose the network you want your ads to run on. For a search ad campaign, you should check only the Search Network. and uncheck the Display Network option. I’d recommend you run a separate ad campaign for display ad campaign type if you want to try the Display Network.
Set Up Location Targeting
In this section, you will select places your customers or prospects are located. To do this, select Enter another location and a search box will appear. Search for the target location if it isn’t available as a default location to choose.
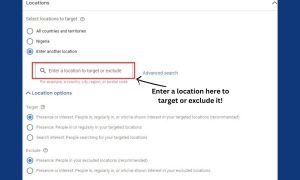
You can target or exclude multiple locations. Your ads will not be served to people staying in locations that you exclude.

For a more granular location targeting setup, click Advanced search. Although, I’d recommend you stick to the basic setup when you are just starting out with Google ads. Only use Advanced search if your location targeting needs to be very precise. Click on Location options to see more location targeting settings and make changes based on your ad campaign goals.

Tip: You don’t have to choose selections recommended by Google. Only choose options that best align with your ad goals whether they are recommended by Google or not. This applies to every aspect of your ad campaign.
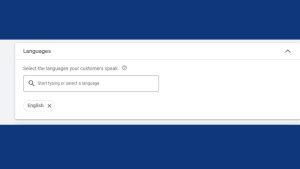
Language
Select the languages your target audience communicate with.
Audience segment
This is the section where you choose the kind of people you want to target for your ad. These audience segments include:
Affinity audience – What their interests and habits are
In-market audiences – What they are actively researching or planning Detailed demographic – Who they are as individuals e.g Marital status, Employment, Education, etc How they have interacted with your business and Your combined audience segment are for advanced audience targeting. You use these audience segments after you have run some ads campaigns and you have retargeting setup in Google analytics.
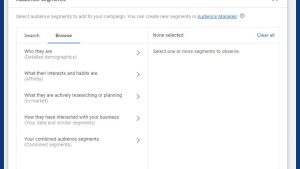
Under the section Targeting setting for this campaign, you should leave it at the recommended selection (Observation). I’d recommend you skip the audience segment section if you are just starting out and are yet to research who your target audience is. Instead, focus more on location-based and keyword-based search ads.
More Settings (Schedule Your Ad)
Set a start and end date for your campaign. As a best practice, leave the ad schedule set at All day, and to get the best results, run ads for 1-3 months. So, why the long wait? Simply put, Google needs to use a lot of processing time to collect a good amount of data to effectively serve your ad to the right audience.

Google can now create ad assets for your campaign automatically by using content from your landing page, domain, and ads (still in BETA). Although this feature is worth exploring, I’d recommend you use the ad assets that you have provided.
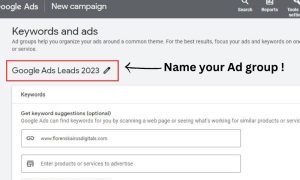
Set Up New Ad Group
Now at the ad group level, the first thing you want to do is give your ad group a name. For a well-structured ad account, I’d recommend naming your campaign and ad group based on a theme.
How many ad groups and ads can I have per campaign?
Depending on the products and services your business provides, you should have no more than 7 – 10 ad groups per campaign but in any case, you’d want to have 2 – 3 ads per ad group. It’s best to have at least two different versions of your ad so you can test and see which performs best.
How many keywords should I use per ad group?
You should have no more than 10-20 keywords per ad group.

Stick to your core keywords and you will be fine. With the updates to Google’s keyword match types function, you do not need to stuff your keyword list with different variations of the same keywords. Consider each keyword match type and see how they fit into your keyword strategy.
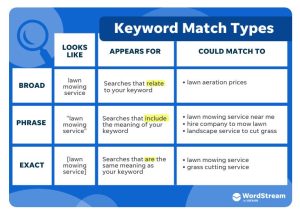
Crash Course on Google keyword match types
Broad match – Ads may show on searches that are related to your keyword, which can include searches that don’t contain the keyword terms. For example, an ad targeting a broad match keyword: lawn mowing service can get triggered when a user does a google search for lawn aeration prices.
The broad match keyword does not have a syntax. Simply enter the word
Phrase match – Ads may show on searches that include the meaning of your keyword. The meaning of the keyword can be implied, and user searches can be a more specific form of the meaning.
For example, an ad targeting a phrase match keyword: “lawn mowing service” can get triggered when a user does a google search for lawn mowing service near me, Hire company to mow lawn, Landscape service to cut grass
The syntax for phrase match is to put quotes “ ” around your keyword, such as “Lawn mowing service”
Exact match – Ads may show on searches that have the same meaning or same intent as the keyword. Of the 3 keyword matching options, exact match gives you the most control over who views your ad, but reaches fewer searches than both phrase and broad match.
For example, an ad targeting an exact match keyword: [lawn mowing service] can get triggered when a user does a google search for lawn mowing service, Grass cutting service
The syntax for exact match is to use square brackets [ ], such as [Lawn mowing service].
(Credits: Wordstream and Google)
How do you choose which keywords to use for Google ads?
How To Use Google Keyword Planner For Keyword Research (even without creating ads)
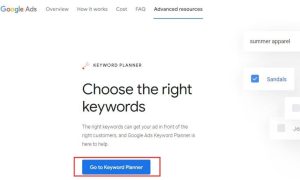
After you have created and set up a Google ads account, go to ads.google.com/home/tools/keyword-planner/ and click Go to keyword planner.
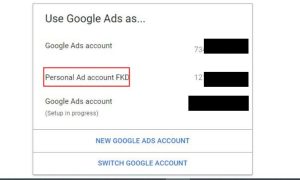
You will be directed to another page that looks like the one below. Select your ad account to gain access to your Google Ad account dashboard.
At the dashboard, click Tools and settings on the top menu tab. Under Planning, select Keyword planner.
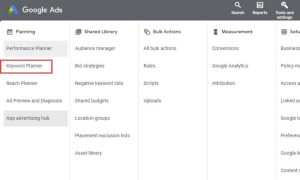
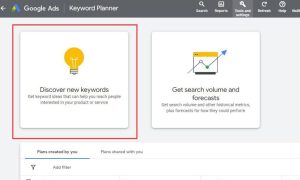
This will take you to the keyword planner as seen below. To start your keyword research, click on Discover new keywords
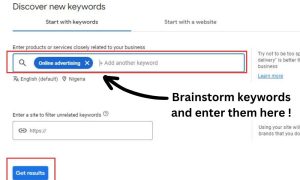
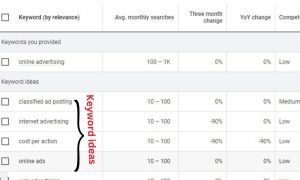
Go through the list of generated keywords ideas and select the best keywords for your ad. Keep in mind their search volume, competition, search intent, and Top-of-page bid.
Search volume – The average number of times people search for a keyword and similar terms based on the month range, the location, and your Search Network settings. This information shows how popular your keywords are during different times of the year.
Competition – shows how competitive ad placement is for a keyword, specific to the location and Search Network targeting options that you’ve selected. The level of competition—low, medium, or high— is determined by the number of advertisers bidding on each keyword relative to all keywords across Google.
Top-of-page bid – shows what advertisers have historically paid for a keyword’s top-of-page bid, based on your location and Search Network settings. The ‘low range’ shows the lower range of what advertisers have historically paid for a keyword’s top-of-page bid based on location and search network setting. The ‘high range’ shows the higher range of what advertisers have historically paid for a keyword’s top-of-page bid.
Tip: A keyword’s search intent and monthly search volume will prove useful when creating an SEO strategy for your website or blog, these factors could contribute to creating blog content that ranks high on SERPs (search engine result pages) and achieving your marketing goals.
Asides from using keywords to conduct keyword research on Google keyword planner, you can also start with a website.
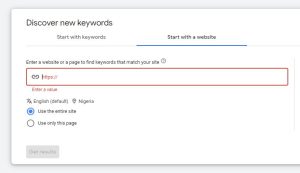
To use this method, enter your website’s URL or the URL of a specific page on your website. This would generate a list of keyword ideas that relate to your website or webpage. Repeat the process of selecting the best keyword ideas for your ad.
Tip: Keep your selected keywords and other ad assets including your ad headlines, meta descriptions, and business information well organized in an Excel spreadsheet.
Create a Responsive Search Ad
URLs
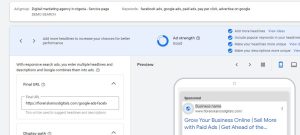
To start creating responsive ads, enter the Final Url – the actual web address of the landing page you are driving traffic to when people click on your ad. Next, enter the Display Url. With its two optional pathways, the display URL gives people an idea of where they will land after they click on your ad. It typically resembles your website’s homepage URL and is the URL that searchers will see when your ad comes up on the SERPs (search engine results pages)
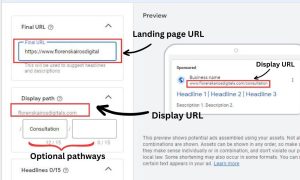
Unlike the display URL, the final URL DOES NOT appear on SERPs.
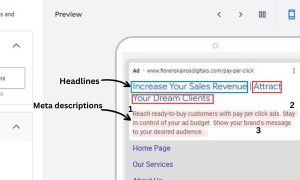
Assets (Headlines & Meta descriptions)
To make your ad compelling to people and get them to do business with you, you need to include assets when creating a responsive search ad (RSA).
Assets are content pieces that make up your ad with useful business information—giving people more reasons to choose your business. Headlines and meta descriptions are required assets for every RSA you create.
You can add up to 15 different headlines and 4 meta descriptions.
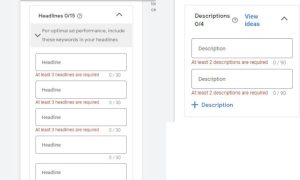
RSA shows different variables or combinations based on the headlines and meta descriptions you have entered. It will rotate headlines and meta descriptions until it finds a combination that gives the best results for that ad. Headlines are a group of words or sentences that promote a product or service.
A headline is typically in large font and used to grab the attention of the reader. A meta description generally informs and interests users with a short, relevant summary of what the ad is about. It highlights what to expect when prospects click on your ad.
While writing headlines and meta descriptions for your ad might seem pretty straightforward, there are certain ways you’d want to go about writing them if you want your ads to beat the competition.
Here are some Google search ad best practices that I’d recommend you use when crafting your headlines and meta descriptions.
Best Practices When Creating a Google Search Ad
- Craft your messaging to focus on user needs and benefits.
- Include at least one of the keywords in your ad group in your headlines.
- Avoid generic sales language.
- Apply all ad extensions that make sense.
- Optimize your landing page. (It doesn’t have to include the keywords but its content should be relevant to the search query and the page should load quickly)
Tip: Take note of your ad strength indicator.
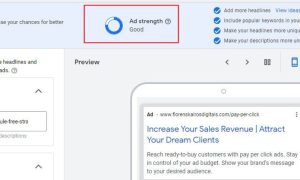
Ad strength shows how well your ad creative follows Google’s best practices for optimal performance.
What Are Google Ad Extensions?
Ad extensions are extra bits of information that you can show alongside your ads. They can contain links to specific subpages on your webpage, a call button, product pricing information, and more. (Learn more about ad extensions here)
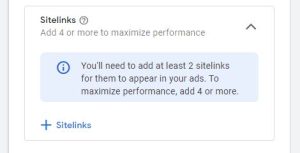
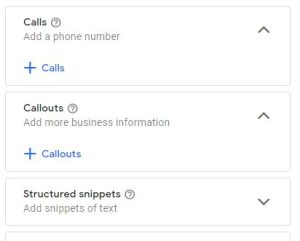
Some commonly used ad extensions include sitelink extensions, callout extensions, structured snippet extensions, and call extensions. Apply as many relevant ad extensions to your ads as possible to increase your ad clicks.
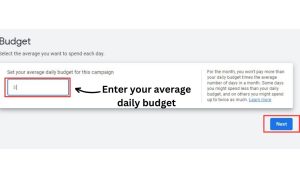
After applying headlines, meta descriptions, and other additional assets to your ad, click Next to set your average daily budget.
Set Your Average Daily Budget
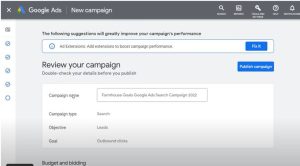
Review and Publish Your Campaign
Double-check your ad details and click Publish campaign.
After publishing your campaign, it will take Google 1-2 business days to review your ads. If your ad passes the review, its status will change to “Eligible”, and it will start to run.
If the review indicates that your ad violates a policy, its status will change to “Disapproved” which means it can’t show anywhere. You’ll be notified of the policy violation and informed of what you can do next.
Create Another Responsive Search Ad for Your Ad Group
Each of your ad groups consists of 2-3 ads. Remember?
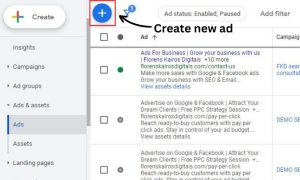
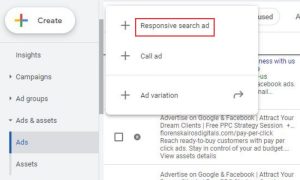
To create a second RSA, go to your ad account dashboard. Click on Ads & assets
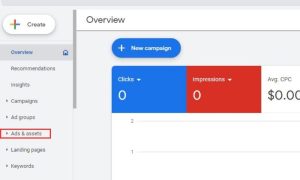
From the drop-down menu, click on Ads and click the + icon to create a new ad. Select responsive search ad
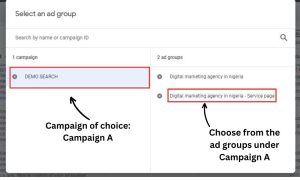
Choose the desired campaign and the ad group you want the ad to fall under.
Start editing your ad assets for the new RSA.
Now It’s Your Turn
We have covered a lot in this post, so let’s finish off with a recap of what you’ve learned so far. You learned about the benefits of Google ads and the hierarchy of a Google ad account structure.
You also learned how to:
- create a Google ads account
- set up ads Billing and conversion tracking with Google Analytics
- use Google keyword planner to conduct keyword research
- Create a responsive search ad.